Maintaining the optimum functionality of a vehicle is essential for both performance and safety. One significant aspect that often requires attention is the enhancement of critical components responsible for the smooth operation of the automobile. Ensuring that these elements remain in good condition can lead to a more efficient drive and overall better experience on the road.
When it becomes necessary to upgrade or improve the mechanisms that manage the expulsion of gases, understanding the process can be daunting for many enthusiasts. However, with the right guidance, it is possible to navigate this journey with confidence and minimal frustration. This knowledge presents a unique opportunity to delve into the practicalities of the task at hand.
Investing time into the examination and upgrading of these integral parts not only contributes to the vehicle’s longevity but can also enhance its overall performance. By following a straightforward approach, you can embark on this transformative adventure with ease, paving the way for a smoother and more enjoyable driving experience.
Understanding Car Exhaust Systems
The mechanism responsible for channeling gases away from the engine plays a crucial role in vehicle performance. It not only aids in reducing harmful emissions but also contributes to the overall efficiency of the automobile. A well-functioning apparatus is essential for optimal engine operation and longevity.
Key Components
A typical setup consists of several integral parts, including the manifold, catalytic converter, muffler, and various pipes. Each component serves a distinct purpose, from filtering pollutants to minimizing noise produced during ignition. Understanding how these elements interact can provide valuable insights into maintenance and troubleshooting.
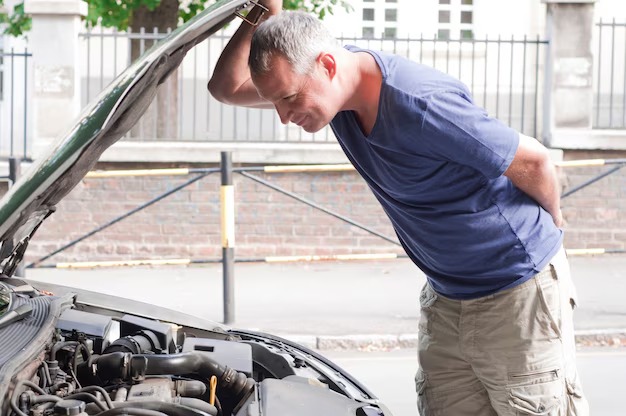
Signs of Malfunction
Recognizing indicators of dysfunction is vital for proactive care. Unusual sounds, decreased fuel efficiency, or visible damage can signify that the apparatus requires attention. Early detection of these issues can prevent further complications and ensure the engine operates smoothly.
Signs You Need a Replacement
Identifying when it’s time for a change is crucial for maintaining optimal vehicle performance and ensuring safety on the road. Various indicators can signal underlying issues with the vehicle’s output mechanism, and recognizing them early can help prevent more significant problems down the line.
A noticeable change in sound is often the first clue. If the engine produces louder or more unusual noises, it may indicate malfunctioning components that require attention. Additionally, visible rust or damage to the piping can compromise functionality, suggesting it might be time for a new setup.
Another vital sign is a decline in fuel efficiency. If you find yourself frequently refueling or noticing fluctuating miles per gallon, it’s worth investigating potential leaks or blockages that could be affecting performance. Furthermore, an increase in emissions can be an alarming indicator that all is not well; failing components may not filter gases correctly, leading to excessive output.
Finally, if you experience vibrations or shaking while driving, it can signify loose or damaged fittings. Addressing these symptoms promptly is essential for maintaining a smooth ride and prolonging the longevity of your vehicle.
Tools Required for the Task
When undertaking this automotive project, having the right equipment is crucial for a successful outcome. The appropriate tools will not only facilitate the process but also ensure that the work is completed safely and efficiently.
- Sockets and Ratchet: Essential for loosening and tightening bolts attached to the components.
- Wrenches: Useful for accessing tight spaces and providing a good grip on various fasteners.
- Jack and Jack Stands: Necessary for lifting the vehicle securely, allowing better access to the undercarriage.
- Screwdrivers: Required for removing clamps or brackets that may be holding the parts in place.
- Cutting Tool: A saw or pipe cutter may be needed if modifications or adjustments to existing pipes are necessary.
- Safety Goggles: Important for protecting eyes from debris during installation.
- Gloves: To prevent hand injuries and keep hands clean while working.
Having these tools at hand will make the entire procedure smoother and help achieve the desired results without unnecessary complications.
Step-by-Step Replacement Process
This section outlines a detailed procedure for swapping out a key component of your vehicle’s performance. Understanding the sequence of tasks involved not only enhances your automotive knowledge but also equips you with the necessary skills to tackle this project efficiently. A systematic approach ensures that all requirements are met while minimizing the likelihood of complications.
Begin by gathering all essential tools and materials for the undertaking. Having everything ready beforehand will streamline the work and avoid unnecessary interruptions. It is advisable to consult a repair manual or online resources specific to your model for any particular considerations.
Next, ensure the vehicle is securely elevated, providing ample space to maneuver safely beneath it. Engage wheel chocks and wear protective gear to prioritize safety throughout the process. Once in position, identify the component that needs to be exchanged and inspect for any visible signs of wear or damage.
Following this, begin the disassembly of the existing part. Carefully loosen clamps and bolts using appropriate tools, taking care not to damage surrounding areas. As each component is removed, keep them organized in a manner that facilitates easy installation of the new unit.
In the next phase, position the new part in place, ensuring it aligns correctly with all necessary mounting points. Secure it firmly once properly situated, taking care to follow torque specifications to prevent future issues. Make sure to reattach any connections that may have been detached during disassembly.
Once the new component is secured, conduct a thorough inspection to ensure all fasteners are tightened and all parts are in their proper positions. Start the engine to check for any leaks or abnormal noises, confirming that everything is functioning as intended. Completing these checks guarantees a successful installation.
Lastly, dispose of any old parts responsibly, and take a moment to enjoy the satisfaction that comes with completing the task. Documenting your work can serve as reference for future endeavors or as an informative guide for others.
Common Mistakes to Avoid
When undertaking the task of upgrading or swapping out key components, it’s crucial to be aware of frequent pitfalls that can lead to complications. Many individuals overlook essential details that may result in ineffective installations or unnecessary expenses. Taking the time to identify these common errors can save considerable time and effort.
Ignoring Quality of Parts
One prevalent mistake is opting for low-quality components to save money. While it may seem economical initially, inferior materials often lead to faster wear and tear. Investing in reliable, well-reviewed parts ensures durability and optimal performance in the long run.
Neglecting Proper Tools and Equipment
Another significant oversight is not using the appropriate tools. Each task requires specific instruments for efficient completion. Avoiding makeshift alternatives can prevent damage to new components and ensure a smoother process. A well-equipped workspace is paramount for achieving the intended results.
Maintaining Your New Exhaust System
Ensuring the longevity and optimal performance of your recent installation requires consistent care and attention. By following a few guidelines, you can enhance its efficiency and prevent premature deterioration. Regular monitoring can also help you detect minor issues before they escalate into significant problems.
Regular Inspections
Conducting periodic assessments is crucial. Look for signs of wear, leaks, or corrosion. Pay attention to unusual sounds, as they may indicate underlying issues that need addressing.
Cleaning and Protection
Keeping the components clean will prevent the buildup of debris and rust. Utilizing rust-resistant coatings can further safeguard metal elements from environmental factors.
| Maintenance Activity | Frequency |
|---|---|
| Visual Inspection | Every 3 months |
| Professional Check-up | Annually |
| Cleaning | Every 6 months |
| Rust Treatment | As needed |
Q&A: How to replace an exhaust
How can you tell if your vehicle’s exhaust system has an exhaust leak?
An exhaust leak can be identified by increased engine noise, a check engine light, or exhaust fumes inside the cabin. Small holes or cracks in the exhaust manifold, exhaust pipe, or flange can allow exhaust gas to escape before reaching the tailpipe. Getting underneath the vehicle and inspecting exhaust components for soot marks or gases escaping can help locate the leak. If an exhaust leak is detected, applying penetrating fluid to bolts and nuts before attempting to fix it will make the process much easier.
What are the steps to install an exhaust system on a car?
To install an exhaust system, start by removing the old exhaust by disconnecting the exhaust hangers and unbolting the exhaust pipe from the exhaust manifold. If the stock exhaust is rusted or stuck, penetrating fluid can come in handy to loosen bolts and nuts. Install the new exhaust by securing the exhaust components with new gaskets and bolts, making sure the flange connections are tight. After installation, a test drive is recommended to check for leaks and ensure proper exhaust work.
Why is a faulty exhaust system dangerous for both the vehicle and the driver?
A faulty exhaust system is dangerous because it can allow exhaust fumes, including carbon monoxide, to penetrate the cabin. This can happen due to small holes in the exhaust pipe, a failing gasket, or broken exhaust hangers holding the exhaust in place. If exhaust gas leaks near the car’s muffler or tailpipe, it can also lead to increased engine noise and reduced performance. Auto repair should be done as soon as possible to prevent harmful fumes from affecting the driver and passengers.
How can you properly secure an exhaust replacement to prevent movement?
To properly secure an exhaust replacement, use rubber hangers and exhaust hangers to hold the exhaust pipe in place. If necessary, weld any loose connections or replace old exhaust components that may be rusted or broken. Ensuring that the exhaust manifold is properly sealed with a new gasket will prevent gases escaping from the engine. Checking for bolt holes alignment and tightening bolts and nuts securely will help prevent exhaust parts from shifting during a test drive.
What should be considered when replacing an oxygen sensor as part of the exhaust system?
When replacing an oxygen sensor as part of the exhaust system, ensure that the area is cool to avoid burns from the hot exhaust. Use proper tools to avoid damaging the sensor threads, and check if you need to remove any nearby components for easier access.
Why is it important to check the condition of the stud when working on the back of the vehicle?
The stud can become corroded or seized, making removal difficult. Applying penetrating oil and using proper techniques can prevent breakage, ensuring that nuts and bolts are securely fastened when reinstalling components.
Why do some mechanics prefer OEM parts over aftermarket options when repairing the entire exhaust system?
Mechanics often choose OEM parts over aftermarket options because they are designed to fit perfectly with the entire exhaust system, reducing the chances of leaks or installation issues. Aftermarket parts may require modifications, which can complicate the repair process.
Why is it important to upload original content when sharing car repair guides in the world on YouTube?
Uploading original content in the world on YouTube ensures credibility and helps fellow car enthusiasts with accurate information. Demonstrating proper techniques, such as how to get an exhaust system installed correctly, makes the content more valuable to viewers.